使用範例
這裡記錄了各種實際使用的範例 ☺️
保持登入
這裡示範了如何保持登入。
import time

import PyPtt


def login():
    max_retry = 5

    ptt_bot = None
    for retry_time in range(max_retry):
        try:
            ptt_bot = PyPtt.API()

            ptt_bot.login('PTT ID', 'PTT PW',
                          kick_other_session=False if retry_time == 0 else True)
            break
        except PyPtt.exceptions.LoginError:
            ptt_bot = None
            print('登入失敗')
            time.sleep(3)
        except PyPtt.exceptions.LoginTooOften:
            ptt_bot = None
            print('請稍後再試')
            time.sleep(60)
        except PyPtt.exceptions.WrongIDorPassword:
            print('帳號密碼錯誤')
            raise
        except Exception as e:
            print('其他錯誤:', e)
            break

    return ptt_bot

if __name__ == '__main__':
    ptt_bot = None
    last_newest_index = None
    try:
        while True:

            try:
                if ptt_bot is None:
                    ptt_bot = login()

                newest_index = ptt_bot.get_newest_index(index_type=PyPtt.NewIndex.BOARD, board='Gossiping')
            except PyPtt.exceptions.ConnectionClosed:
                ptt_bot = None
                continue
            except Exception as e:
                print('其他錯誤:', e)
                break

            if newest_index == last_newest_index:
                continue
            last_newest_index = newest_index

            print('有新文章!', newest_index)

            # do something

            time.sleep(5)
    finally:
        ptt_bot.logout()
幫你的文章上色
如果在發的時候有上色的需求,可以透過模擬鍵盤輸入的方式達到加上色碼的效果。
import PyPtt

content = [
    PyPtt.command.ctrl_c + PyPtt.command.left + '5' + PyPtt.command.right + '這是閃爍字' + PyPtt.command.ctrl_c,
    PyPtt.command.ctrl_c + PyPtt.command.left + '31' + PyPtt.command.right + '前景紅色' + PyPtt.command.ctrl_c,
    PyPtt.command.ctrl_c + PyPtt.command.left + '44' + PyPtt.command.right + '背景藍色' + PyPtt.command.ctrl_c,
]
content = '\n'.join(content)

ptt_bot = PyPtt.API()
try:
    # .. login ..
    ptt_bot.post(board='Test', title_index=1, title='PyPtt 程式貼文測試', content=content, sign_file=0)
finally:
    ptt_bot.logout()
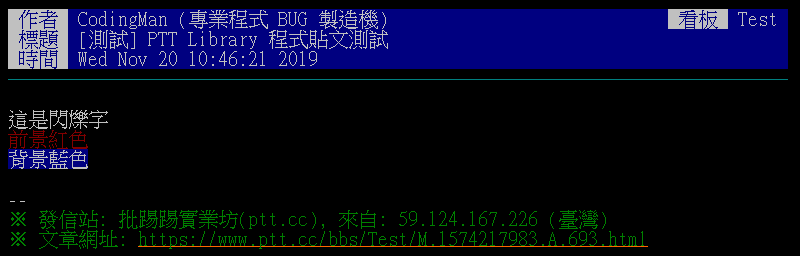
色碼對照
色碼是標準 ANSI SGR 參數,可以用 ; 串接多個屬性:
重置
0、高亮(亮色)``1``、閃爍5前景色:
30黑31紅32綠33黃34藍35洋紅36青37白背景色:
40黑41紅42綠43黃44藍45洋紅46青47白
組合色碼與一行多色
上面每一段的原理是:command.ctrl_c 在編輯器插入一組 ANSI 色碼,command.left 把游標退到屬性欄位,輸入色碼後 command.right 移出,接著打上要上色的文字,最後再一個 command.ctrl_c 把顏色重置。
把多個屬性用 ; 串起來就能疊加,例如 1;33;44 是「亮黃字配藍底」;同一行也可以放多段不同顏色。實務上包一個小函式重複使用會更好讀:
import PyPtt
c, left, right = PyPtt.command.ctrl_c, PyPtt.command.left, PyPtt.command.right

def color(attr, text):
    # attr 例如 '1;33;44' 代表亮黃字、藍底
    return c + left + attr + right + text + c

content = (
    color('1;31', '紅') + color('1;32', '綠') + color('1;33', '黃') + '\n'
    + color('1;33;44', ' 亮黃字藍底 ') + '  ' + color('1;36', '亮青字')
)
同樣的技巧也可以用在 set_signature_file,寫出彩色的名片檔(名片檔在查詢畫面大約只顯示 16 行,設計時請留意行數)。
如何判斷文章資料是否可以使用
當 get_post 回傳文章資料回來時,這時需要一些判斷來決定是否要使用這些資料。
import sys

import PyPtt

ptt_bot = PyPtt.API()
try:
    # .. login ..
    post_info = ptt_bot.get_post('Python', index=1)

    print(post_info)

    if post_info[PyPtt.PostField.post_status] == PyPtt.PostStatus.EXISTS:
        print('文章存在!')
    elif post_info[PyPtt.PostField.post_status] == PyPtt.PostStatus.DELETED_BY_AUTHOR:
        print('文章被作者刪除')
        sys.exit()
    elif post_info[PyPtt.PostField.post_status] == PyPtt.PostStatus.DELETED_BY_MODERATOR:
        print('文章被版主刪除')
        sys.exit()

    if not post_info[PyPtt.PostField.pass_format_check]:
        print('未通過格式檢查')
        sys.exit()

    print('文章資料可以使用')
finally:
    ptt_bot.logout()
文章格式檢查無法通過,但有固定格式時如何處理?
在上一個章節看到當 get_post 回傳文章資料回來時,這時需要使用 PyPtt.PostField.pass_format_check 來判斷決定是否要使用這些資料。
但如果是已經被編輯過的文章,可能會無法通過格式檢查,這時除了可以透過 PyPtt.PostField.full_content 來取得文章內容,並自行解析外,也可以透過一些手段來修改 PyPtt 判斷文章格式的方式。
以下是未修改過的 PTT 文章結尾格式。
--
※ 發信站: 批踢踢實業坊(ptt.cc), 來自: 175.xxx.xx.2 (馬來西亞)
※ 文章網址: https://www.ptt.cc/bbs/Stock/M.1713918602.A.9A8.html
以下是 Stock 版常常出現的編輯後格式。
--
※ 文章網址: https://www.ptt.cc/bbs/Stock/M.1714437002.A.883.html
因為格式是固定的,所以可以透過新增文章結尾的方式來達到通過格式檢查的效果。
import os

import PyPtt


if __name__ == '__main__':
    ptt_bot = PyPtt.API()

    try:
        ptt_bot.login(
            os.environ['PTT1_ID'],
            os.environ['PTT1_PW'])

        post_info = ptt_bot.get_post('Stock', aid='1c5YhY_K')

        # output False
        print(post_info[PyPtt.PostField.pass_format_check])

        # Add custom content_end_list

        from PyPtt import screens
        screens.Target.content_end_list.append('--\n※ 文章網址')

        post_info = ptt_bot.get_post('Stock', aid='1c5YhY_K')

        # output True
        print(post_info[PyPtt.PostField.pass_format_check])

    except Exception as e:
        print(e)
    finally:
        ptt_bot.logout()
這樣就可以透過新增文章結尾的方式來達到通過格式檢查的效果。
你可以在 PyPtt.screens.Target 找到更多可以修改的屬性。